
| index | introduction | document properties | positioned elements | previewing | element properties | page backgrounds | images | grouping | alignment |
As you can gather, sometimes creating a layout can be fiddly. In page layout applications, it's not uncommon to be able to group together elements. The images which provide the text on the circle could certainly benefit from this. That way, if we ever need to move them, then they can be moved all at once.
Because you are in fact creating and working with HTML when you work with Layout Master, grouping elements together is just a little different from what you might be familiar with in non-HTML page layout applications. To group elements together, we create a new positioned element, and then put the elements we want to group inside this element. When we do this we are making changes to the HTML containment hierarchy. If you have limited familiarity with standards based HTML you may choose to ignore containment and grouping to begin with. It certainly isn't vital to the use of Layout Master, merely convenient on some occasions. If you're interested in learning standards based HTML 4.0 and XHTML our self paced course HTML 4.0 and XHTML 1 for CSS might be just what you are looking for.
So, let's now create a new positioned element, then put all the elements around the circle into it.
Exercise
Step one is to create a new positioned element. Make sure that you give it a sensible name, something like group. To decrease complexity use the Location tab in the Element Properties Editor to position the new element 0px from the top and 0 px from the left.
We should be very familiar with doing all this.
Exercise
Let's now size and position this element so that it we can put the other elements into it.
Now, you'll notice that the new element is on top of (or covers) the other elements. We haven't had to think about this yet, but what happens when two or more elements overlap? One of them is obviously "in front of" the others. In this case, the newest element is in front of the others we created before. What does this "in front of" in fact mean? In CSS, we can specify where in the order from closest to the front backwards an element is. This is often referred to as the stacking order, and technically it is specified by the z-index of an element.
z-index is specified as a whole number and stacking order works as follows. Given two elements which have the same parent element, the element with the higher z-index is closer to the front.
If you're not overly familiar with hand-coded HTML don't worry about this too much, because Layout Master makes it easy to arrange elements intuitively, rather than relying on this technical stuff. Again, you'll find it works similarly to other page layout applications you might have used.
To bring an element closer to the front by one, that is closer to the front than the element currently just in front of it
1. with the element selected, choose from the menu
To bring an element to the front
1. with the element selected, choose from the menu
To send an element further from the front by one, that is further from the front than the element currently just behind it
1. with the element selected, choose from the menu
To send an element to the back
1. with the element selected, choose from the menu
There is also a stacking editor, that provides a button for each of these.
To open the stacking editor
1. click the stacking editor button ![]() in the Launcher
in the Launcher
The stacking editor opens

figure 20: stacking editor
From left to right, these buttons move the selected element or elements closer, to the front, further and to the back. When you first start using Layout Master you might find using the tooltips handy.
Exercise
We want to send our group element to the back. Let's do that now. Simply select our group in the layout then hit the last button on the stacking editor.
Once it is at the back, we are ready to put the other elements into it.
Sometimes its good to have a different view of the elements in a page, other than a purely visual way, as we have been doing so far. The Elements Editor shows a list of the names of each of the elements in the stacking order they appear in the layout. As we will see in a moment, they also show whether elements contain one another. First, let's open this editor.
To open the elements editor
1. click the elements editor button ![]() in the launcher
in the launcher
The elements editor opens. Depending on what names you've actually given your positioned elements, it should look something like this. If you select something in the Elements Editor, that element will be selected in the layout.

figure 21: elements editor
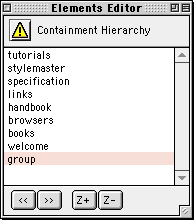
The order from top to bottom is the order of the elements, as we said, in z-index, from frontmost to backmost. The element which is furthest to the back will be at the bottom of the list. At the moment this is the element named "group".
The buttons Z+ and Z- increase and decrease an element in the stacking order by one.
The >> button moves an element into the element immediately above it in the stacking order that shares the same parent. This sounds a little complex, but is more simple in application, as we will see in a moment.
The << button moves an element out of its parent element.
Exercise
Use the Z+ button to move the element named group to the top of the list.
Now we want to move each of the elements, except the welcome element, into the group element.
To move an element into another element
1. In the Elements Editor the element we want to move must be directly below the element we want to move it into in the stacking order
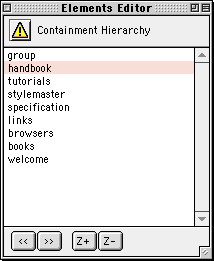
For example, to move handbook into group, we'd need the following situation.

figure 22: elements editor, containment 1
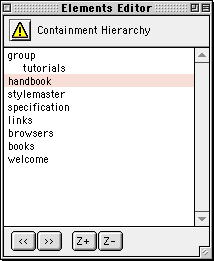
or if the group element already contains some elements, we will need to have this

figure 23: elements editor, containment 2
2. click the >> button
The selected element name is indented in the elements editor to signify that it is a child of the element we have just moved it into. From now on whenever you select and move the element named group, all the elements it contains will move as well.
Exercise
Move each of the elements except the welcome element into the group element.
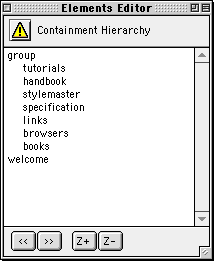
Here is what our elements editor should look like now.

figure 24: elements editor, with nested elements
Now, for example, if you change the position of your background it will be a simple matter to move all these other elements you went to so much trouble to place on the circumference of the circle.
| index | introduction | document properties | positioned elements | previewing | element properties | page backgrounds | images | grouping | alignment |